Logistics Tab
The Logistics tab is where the Tech Pack stops being a design document and starts being a manufacturing document. It plays three roles at once:
- Sourcing document. It tells the purchasing team exactly which raw materials are needed to produce the garment — fabric, trims, labels, packaging, every component.
- Costing document. Every raw material and every service carries a cost. Those costs roll up into the Costing tab, which is what determines the ideal selling rate.
- Production roadmap. It tells the floor which sizes can be cut, which variants are available, and which services (cut, stitch, wash, finish) the garment passes through — and in what sequence.
The tab has four sections, top to bottom: Setup (sizes and variants), Raw Materials, Services, and Bill of Materials.
Repeat-design vs. one-off styles. Quantities on variants and ratios on sizes are optional here. You'll get another chance to set them on the Production Order — and if you fill them on the Tech Pack, the Production Order will pre-load with those values. This lets a single Tech Pack work for both factories that repeat the same design across many production orders, and factories where each style is exclusive to one customer or season.
Setup
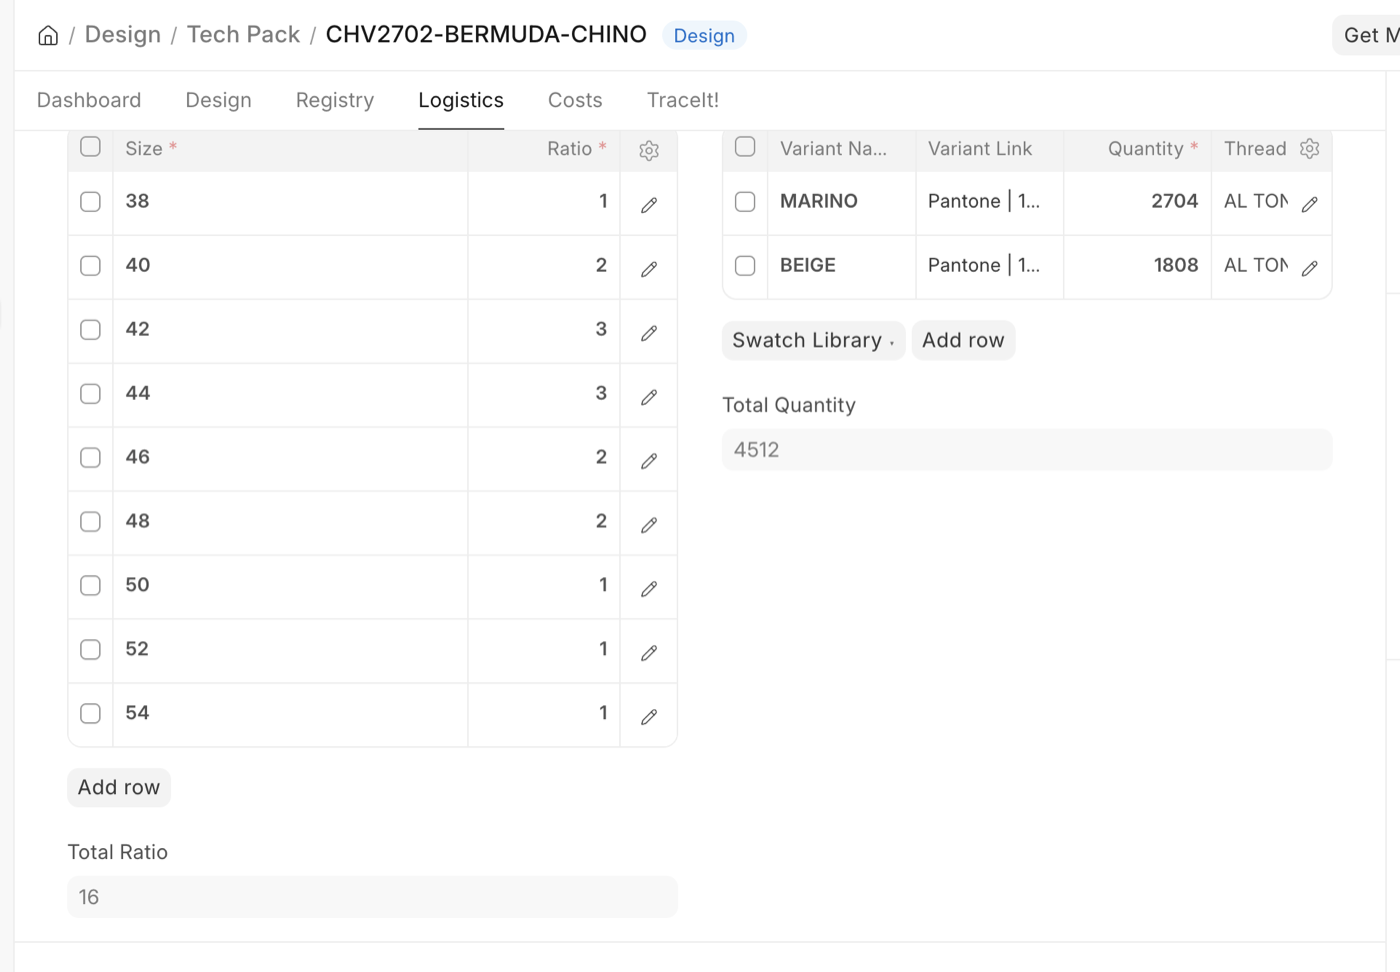
Setup defines what gets made, and how many of each. Two tables side by side.
Sizes. A table of size codes and production ratios. The size code is whatever your scale uses — XS / S / M / L / XL, or EU 36 / 38 / 40, or 2T / 3T / 4T for kids. The Ratio is a relative integer; XS=1, S=2, M=3, L=2, XL=1 means M gets the largest share and the extremes get the smallest. Total Ratio sums the column. Ratios are used downstream when material consumption is split across sizes — a fabric quantity defined at the variant level gets distributed across sizes by their ratio.
Variants. A table of color/style variants of this style. Each row needs a Variant Name and (optionally) a planned Quantity. Link a Variant master record and Color and Image fetch automatically. The Thread section captures thread color, weight (Thin ~40, Medium ~30, Thick ~20), and whether the thread is textured. Total Quantity sums all variant quantities.
The variants you enter here are what the Create Sample dialog on the Design tab pulls from. If a variant isn't in this list, you can't sample it.
Raw Materials
Every material the garment touches goes here — fabric, trims, labels, hangtags, polybags, packaging. One row per material.
Per row: - Type — the Item Group (Trim, Fabric, Packaging, etc.). - Raw Material — a short reference name (e.g. "Main Fabric", "Polybag", "Care Label"). - Item — the ERPNext Item this row resolves to. Can be a concrete Item or a template Item with variants (see below). - Quantity and Cost — per-unit consumption and per-unit cost. Sub Total auto-fills as quantity × cost. - Operation — required. Which manufacturing operation this material belongs to (CUT, STITCH, WASH, etc.). When you set it, a matching row is auto-added to Services if one isn't there already.
A good Tech Pack lists every material the garment touches, not just the headline fabric. The minute you forget the woven label, the hangtag, or the polybag, your cost rollup undershoots and purchasing chases shortages later.
Total Materials sums the sub-totals across all rows.
Give every row a distinct Raw Material name. The name is what builds the BOM reference, so two rows both called "Thread" collapse into a single BOM row — only the last quantity survives into the plan, while costing still charges for both. You'd buy for one and quote for two.
GarmentFlow catches this on save and renames the duplicates Thread-1, Thread-2, telling you it has done so. Don't lean on that: name them for where they're used — Thread - Topstitch, Thread - Overlock — and the BOM stays readable to the person picking items later.
How the BOM Explodes: By Size and By Variant
Two checkboxes on each Raw Materials row drive how the Bill of Materials below splits out:
- By Variant — tick when the material changes for each variant. Think buttons, thread, or the main fabric itself: a Red Shirt needs Red Poplin 120gsm and red 4-hole buttons; the Blue Shirt needs Blue Poplin and blue buttons. One Raw Materials row, one BOM row per variant.
- By Size — tick when the material changes per size. Think size labels, or a zipper length that grows with the garment.
- Both — tick both when the material changes across both axes. Classic example: zippers on a pant. A Blue Pant size 40 needs
YKK-4.5YG-15CM-560(where560is the YKK color code for Navy Blue); the same style in size 42 needs the longer zipper, and the Black Pant needs a different color code entirely. One Raw Materials row generates one BOM row per (size × variant) combination. - Neither — the same concrete Item is used across the whole run.
When you tick either box, the Item on the Raw Materials row is treated as a template — an ERPNext Item with variants enabled. The BOM below auto-generates a row per combination, and on each row you pick the exact variant Item that applies (the dropdown is filtered to that template's variants, so only valid candidates appear). GarmentFlow then remembers your choice for next time — a powerful tool: once you've told it "Blue Pant size 40 takes YKK-4.5YG-15CM-560," that preference is locked into this Tech Pack and used automatically when production quantities are entered later.
Services
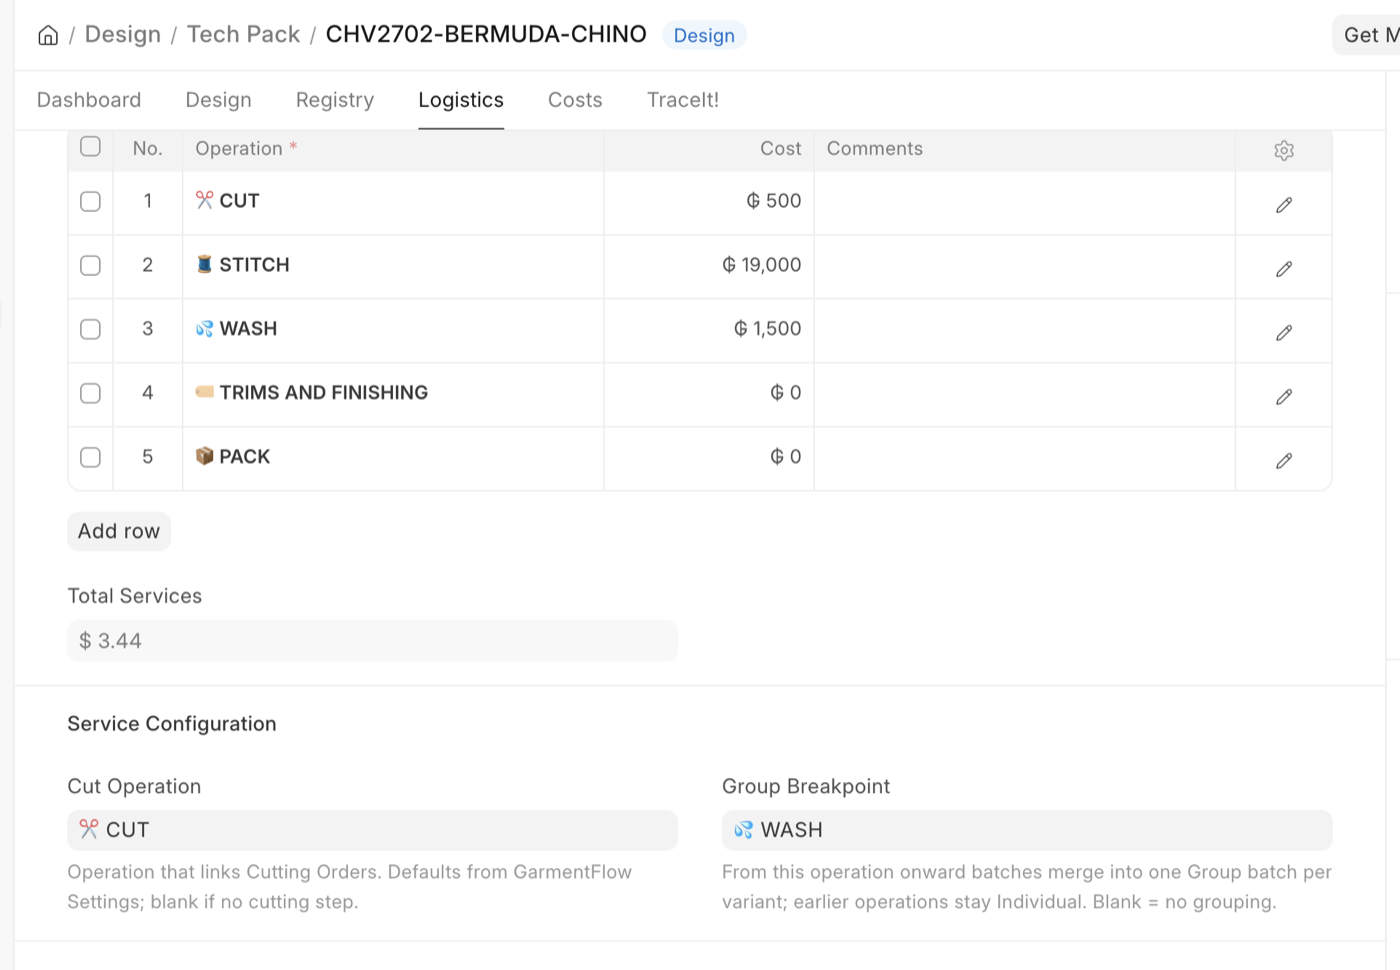
Services lists the operations the garment goes through and how each one handles production batches. Most rows arrive here automatically — when you set the Operation on a Materials row, a matching Service is added if it doesn't exist. You can also add rows directly.
Per row: - Operation — the operation master (CUT, STITCH, WASH, etc.). - Cost — the per-garment cost of running this operation, in your local currency. - Comments — free-form notes for the production floor.
The order of the rows is the execution sequence — drag to reorder.
Total Services sums the Cost column, adjusted for the exchange rate.
Service Configuration
How an operation forms production batches is no longer set row by row. Instead, two fields below the Services table define the whole flow, and every operation's behaviour is derived from them:
- Cut Operation — the operation that links to Cutting Orders and fans the line out into one batch per cutting lay (this per-lay batch is what gives you fabric-roll traceability). Defaults from GarmentFlow Settings → Cutting Operation, and you can override it per Tech Pack. Leave it blank for a product with no cutting step.
- Group Breakpoint — the operation where individual batches converge into a single Group batch per variant. This operation and every operation after it run as Group; everything before stays Individual. It must come after the Cut Operation (the picker only offers later operations). Leave it blank for no grouping — the flow stays individual end to end.
From those two settings, each operation resolves to one of three behaviours:
- Cut — the Cut Operation: born from a Cutting Order, one batch per lay.
- Individual / Direct — any operation before the Group Breakpoint: the batch flows through 1:1, its code travelling with the work (stitching, embroidery, finishing).
- Group — the Group Breakpoint onward: batches from several runs pool into one load per variant (wash, laser, pack).
Example: for
CUT → STITCH → WASH → TRIMS → PACKwith Cut OperationCUTand Group BreakpointWASH, CUT and STITCH run as individual batches while WASH, TRIMS, and PACK run as one group batch per variant.
The same two fields appear on the Production Order (seeded from the Tech Pack), so a planner can adjust the cut and grouping for a specific order without editing the Tech Pack.
Bill of Materials
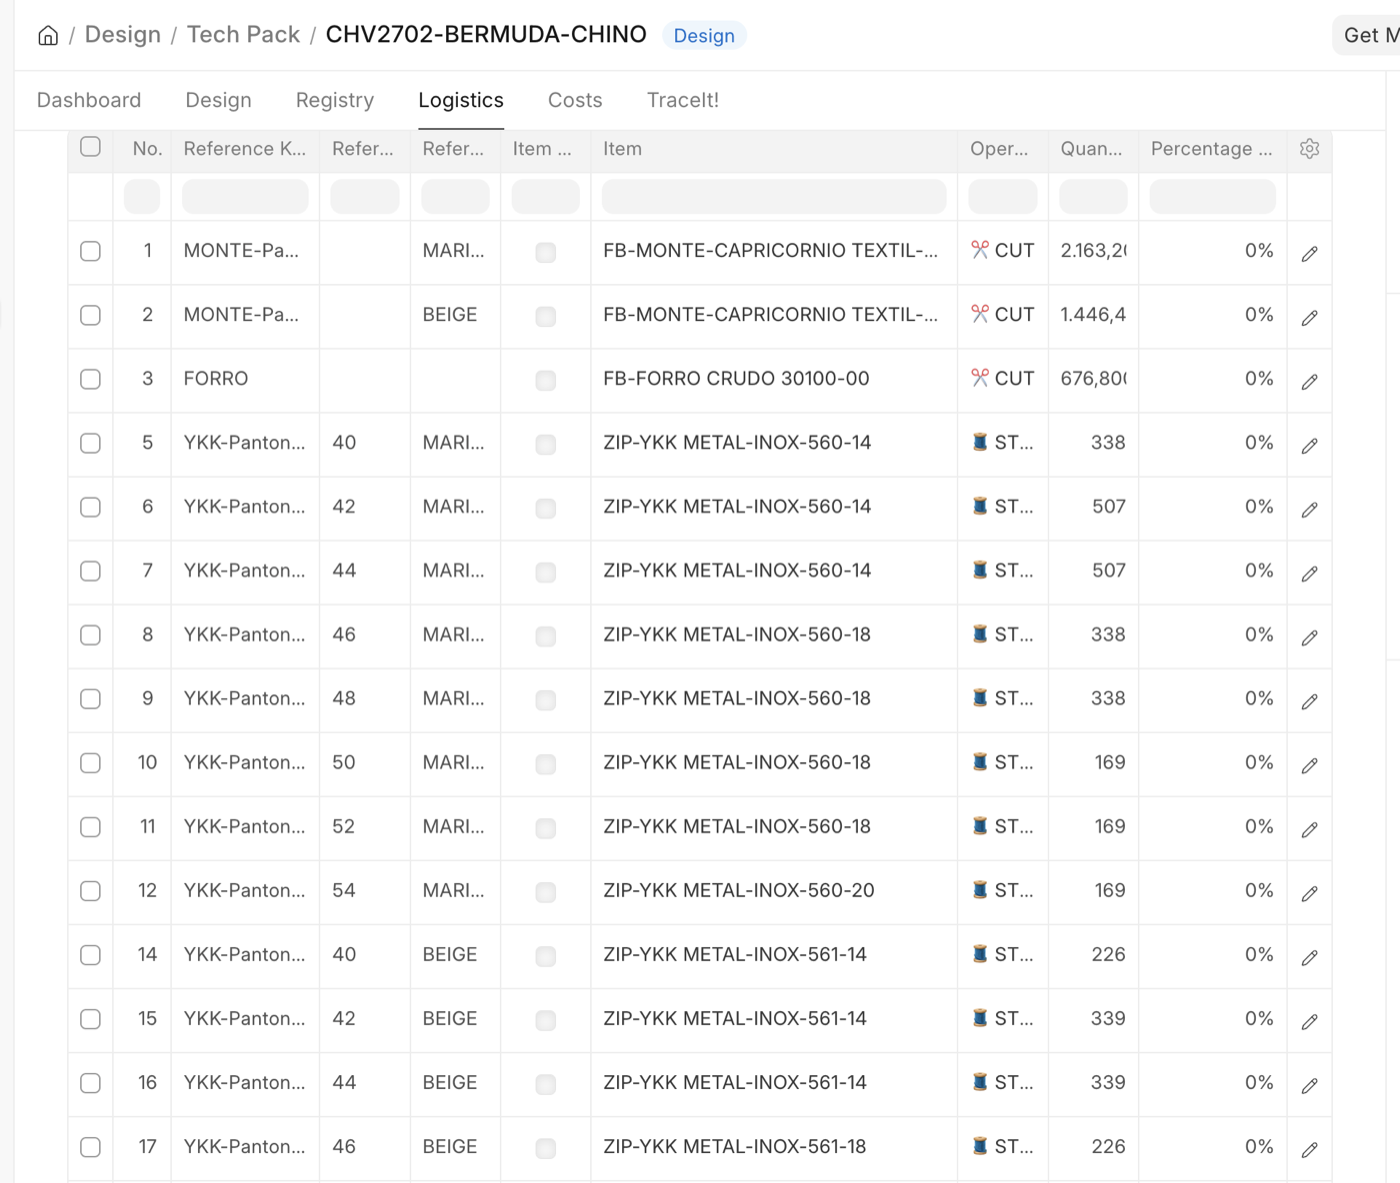
The BOM is the rolled-up output of Raw Materials × Sizes × Variants for this style, in the form the rest of the factory consumes. Purchasing reads it to know what to buy. Planning reads it to schedule operations. Costing reads it to compute the per-garment cost.
You don't type the BOM by hand. It rebuilds from the upstream tables on every save:
- A Material with neither By Size nor By Variant → one BOM row, quantity × Total Quantity.
- A Material with By Variant → one BOM row per variant.
- A Material with By Size → one BOM row per size, quantity weighted by ratio.
- A Material with both → one BOM row per (variant × size) combination.
Each BOM row has a deterministic reference like MainFabric-Red-M, and inherits the Operation from the source Material. Once you assign a specific variant Item to a row (e.g. the navy zipper for Blue 40), GarmentFlow remembers it — and uses it later to automatically calculate exactly how much of each raw material to buy, based on the quantities and sizes you set on the Production Order.
When you do touch a BOM row: if a Material is set to By Size or By Variant but the auto-resolution couldn't find a matching variant Item, the Item column on that row is left empty. Open the row and pick the correct Item — the dropdown is filtered to variants of the source Material's template Item, so only valid candidates appear.
Item TBD: deferring a decision to the Production Order
Sometimes the item genuinely cannot be chosen yet. The brand hasn't confirmed the trim supplier, the zipper color depends on a fabric lot that hasn't landed, the customer is still arguing about the hangtag. Guessing an item to get past the submit gate is worse than admitting you don't know — the wrong item quietly becomes the wrong purchase order.
Item TBD — To Be Determined — is how you say so on the record. Tick it on a row and the Item field goes read-only and stays empty on purpose. The decision moves to the Production Order, where the planner picks the real item before production is submitted.
The checkbox sits on both tables and they work together:
- On a Raw Materials row — marks every BOM row generated from that material. Use it when the whole material is undecided.
- On a BOM row — marks that one combination. Use it when only the navy zipper is unsettled and the black one is fine. A per-row decision sticks, even when the BOM rebuilds.
Picking an Item unticks Item TBD automatically — choosing an item is the opposite of not knowing it.
Review Missing Items. While the Tech Pack is a draft, a button appears with a count of BOM rows that have no Item and haven't been marked TBD — for example Review Missing Items (7). The dashboard shows the same count. Click it and you get every item-less row in one table with a tick box per row, plus Mark all as Item TBD and Clear all for bulk work. Apply writes your ticks back and saves.
This is the fastest way to close out a spec: open it once, tick the handful that are genuinely undecided, and everything else stands out as work still to do.
At submit, the two cases are treated very differently:
- Rows with no Item, not marked TBD — submit is blocked. You get the list of offending rows and a Mark These as Item TBD button, so if the answer is "these are all genuinely undecided," it's one click.
- Rows marked Item TBD — submit succeeds, with a note reminding you that those items must be specified at Production Order before it can be submitted.
Item TBD is a promise, not an escape hatch. Every row you defer has to be decided on the Production Order before that order can be submitted. It moves the decision to the person and the moment best placed to make it — it doesn't remove it.
The remaining BOM fields (Quantity per Box, Percentage Waste, UOM) are populated from the Item master where possible. Adjust per-row only when this style genuinely needs different values — a higher waste tolerance for a tricky fabric, a smaller box for fragile trims.
What to do next
With Logistics done, the spec is essentially complete. Move to the Registry tab to generate barcodes for production labeling, or jump to Costs to see what the style is worth.